From Docker to OpenShift: Deploying Containers Made Easy
Learn how to deploy Docker containers in OpenShift with ease. This post covers the key steps, from containerizing an app to running it on OpenShift, with best practices.

Introduction
Containerization has revolutionized software development and deployment. Developers can package applications and their dependencies into lightweight, portable containers that run consistently across various environments. Docker has been a major force in this transformation, simplifying the creation and management of containers. However, as applications grow, managing multiple containers across different environments becomes complex. This is where OpenShift steps in.
OpenShift, an enterprise Kubernetes platform, enhances container orchestration, offering security, automation, and scalability. If you are familiar with Docker but new to OpenShift, this guide will help you transition smoothly by providing a step-by-step walkthrough.
Understanding the Basics: Docker vs. OpenShift
Before diving into deployment, let's clarify the difference between Docker and OpenShift:
- Docker is a platform that enables developers to build, share, and run containers. It provides a simple way to package applications and ensures consistency between development and production.
- OpenShift is a Kubernetes-based platform that manages and orchestrates containerized applications. It provides additional enterprise-grade security, automation, and developer-friendly tools.
While Docker focuses on individual containers, OpenShift handles entire application lifecycles, including scaling, networking, and monitoring. OpenShift builds on Kubernetes, adding features that make deploying and managing applications easier for enterprises.
Setting Up OpenShift
To get started with OpenShift, you need an environment to deploy your containers. OpenShift can be installed in various ways:
- OpenShift Local (formerly Minishift) – Ideal for testing and development. This lightweight version lets you run OpenShift on your local machine.
- OpenShift on a Public Cloud (AWS, Azure, GCP) – Best for scalability and enterprise deployment. This allows you to leverage managed services.
- Self-Managed OpenShift (Bare Metal or Virtual Machines) – Provides full control over the infrastructure, making it suitable for custom configurations.
For a quick setup, OpenShift Local is a great choice. Install it using:
curl -LO https://github.com/code-ready/crc/releases/latest/download/crc-linux-amd64.tar.xz
sudo tar -xvf crc-linux-amd64.tar.xz -C /usr/local/bin/
sudo crc setup
crc start
Once OpenShift is running, log in using:
oc login -u developer -p developer https://api.crc.testing:6443This allows you to interact with the OpenShift cluster and begin deploying applications.
Deploying a Docker Container to OpenShift
Let's walk through deploying a simple Docker container to OpenShift.
Step 1: Create a Docker Image
A Docker image is a package that contains the application code and its dependencies. Suppose you have a simple Node.js application:
FROM node:16
WORKDIR /app
COPY . .
RUN npm install
CMD ["node", "server.js"]
EXPOSE 3000
This Dockerfile defines a lightweight container with Node.js, sets the working directory, copies files, installs dependencies, and runs the application.
Build and tag the image:
docker build -t my-node-app .The -t flag names the image, making it easier to reference in the next steps.
Step 2: Push Image to a Registry
OpenShift can pull images from Docker Hub, private registries, or its built-in registry. To push your image to Docker Hub:
docker login -u myusername -p mypassword
docker tag my-node-app myusername/my-node-app:latest
docker push myusername/my-node-app:latest
Alternatively, use OpenShift’s internal registry:
oc new-project myproject
oc login -u developer
oc registry login
docker tag my-node-app default-route-openshift-image-registry.apps-crc.testing/myproject/my-node-app
docker push default-route-openshift-image-registry.apps-crc.testing/myproject/my-node-app
Step 3: Deploy the Image in OpenShift
Now that the image is in a registry, deploy it using OpenShift’s oc new-app command:
oc new-app myusername/my-node-app:latest --name=my-node-appFor an internal registry:
oc new-app image-registry.openshift-image-registry.svc:5000/myproject/my-node-app --name=my-node-appThis command creates a deployment and a service, ensuring your application runs within OpenShift.
Verify the deployment:
oc get podsIf all goes well, you should see your application's pod running.
Step 4: Expose the Application
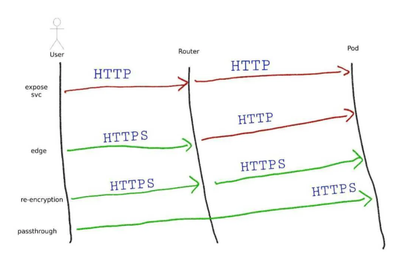
By default, your application is not accessible from outside the OpenShift cluster. To expose it, create a route:
oc expose service my-node-app --hostname=my-node-app.apps-crc.testingRetrieve the external URL:
oc get route my-node-appVisit the URL in your browser to verify the application is accessible.
Advanced OpenShift Features
Scaling Applications
Scaling in OpenShift allows your application to handle increased traffic. Increase the number of replicas using:
oc scale deployment my-node-app --replicas=3Check the number of running pods:
oc get podsThis helps distribute the load and improve availability.
Managing Logs and Monitoring
Logs provide insights into application behavior. View logs using:
oc logs -f deployment/my-node-appFor advanced monitoring, OpenShift integrates with Prometheus and Grafana, allowing for real-time metrics and visualization.
Rolling Updates and Rollbacks
To deploy a new version of your application, update the image:
oc set image deployment/my-node-app my-node-app=myusername/my-node-app:v2If something goes wrong, roll back to the previous version:
oc rollout undo deployment/my-node-appSecurity Considerations
OpenShift enforces strict security policies:
- Runs containers as non-root by default to prevent privilege escalation.
- Implements role-based access control (RBAC) to restrict user permissions.
- Scans container images for vulnerabilities before deployment.
To modify security settings, use:
oc adm policy add-scc-to-user anyuid -z defaultOnly modify these settings if absolutely necessary to maintain security best practices.
Conclusion
Transitioning from Docker to OpenShift enhances container management with automation, scalability, and security. While Docker simplifies containerization, OpenShift provides a robust, production-ready platform with powerful orchestration tools.
By following this guide, you’ve learned how to deploy a Docker container to OpenShift, manage scaling, monitor applications, and maintain security. As you continue exploring OpenShift, experiment with its CI/CD capabilities, service mesh integration, and GitOps workflows.
Are you ready to fully embrace OpenShift? Dive deeper into its features and optimize your containerized applications for real-world scalability and security.


Comments